📸 The Magazine For Photographers - Bite Size
Read the Latest Photography News and Updates in the Creative Industry in 3-4 minutes or less ;)
In partnership with

Important note: All photography articles are NOT sponsored
The Latest News:
Ulanzi’s New Hasselblad Camera Cage
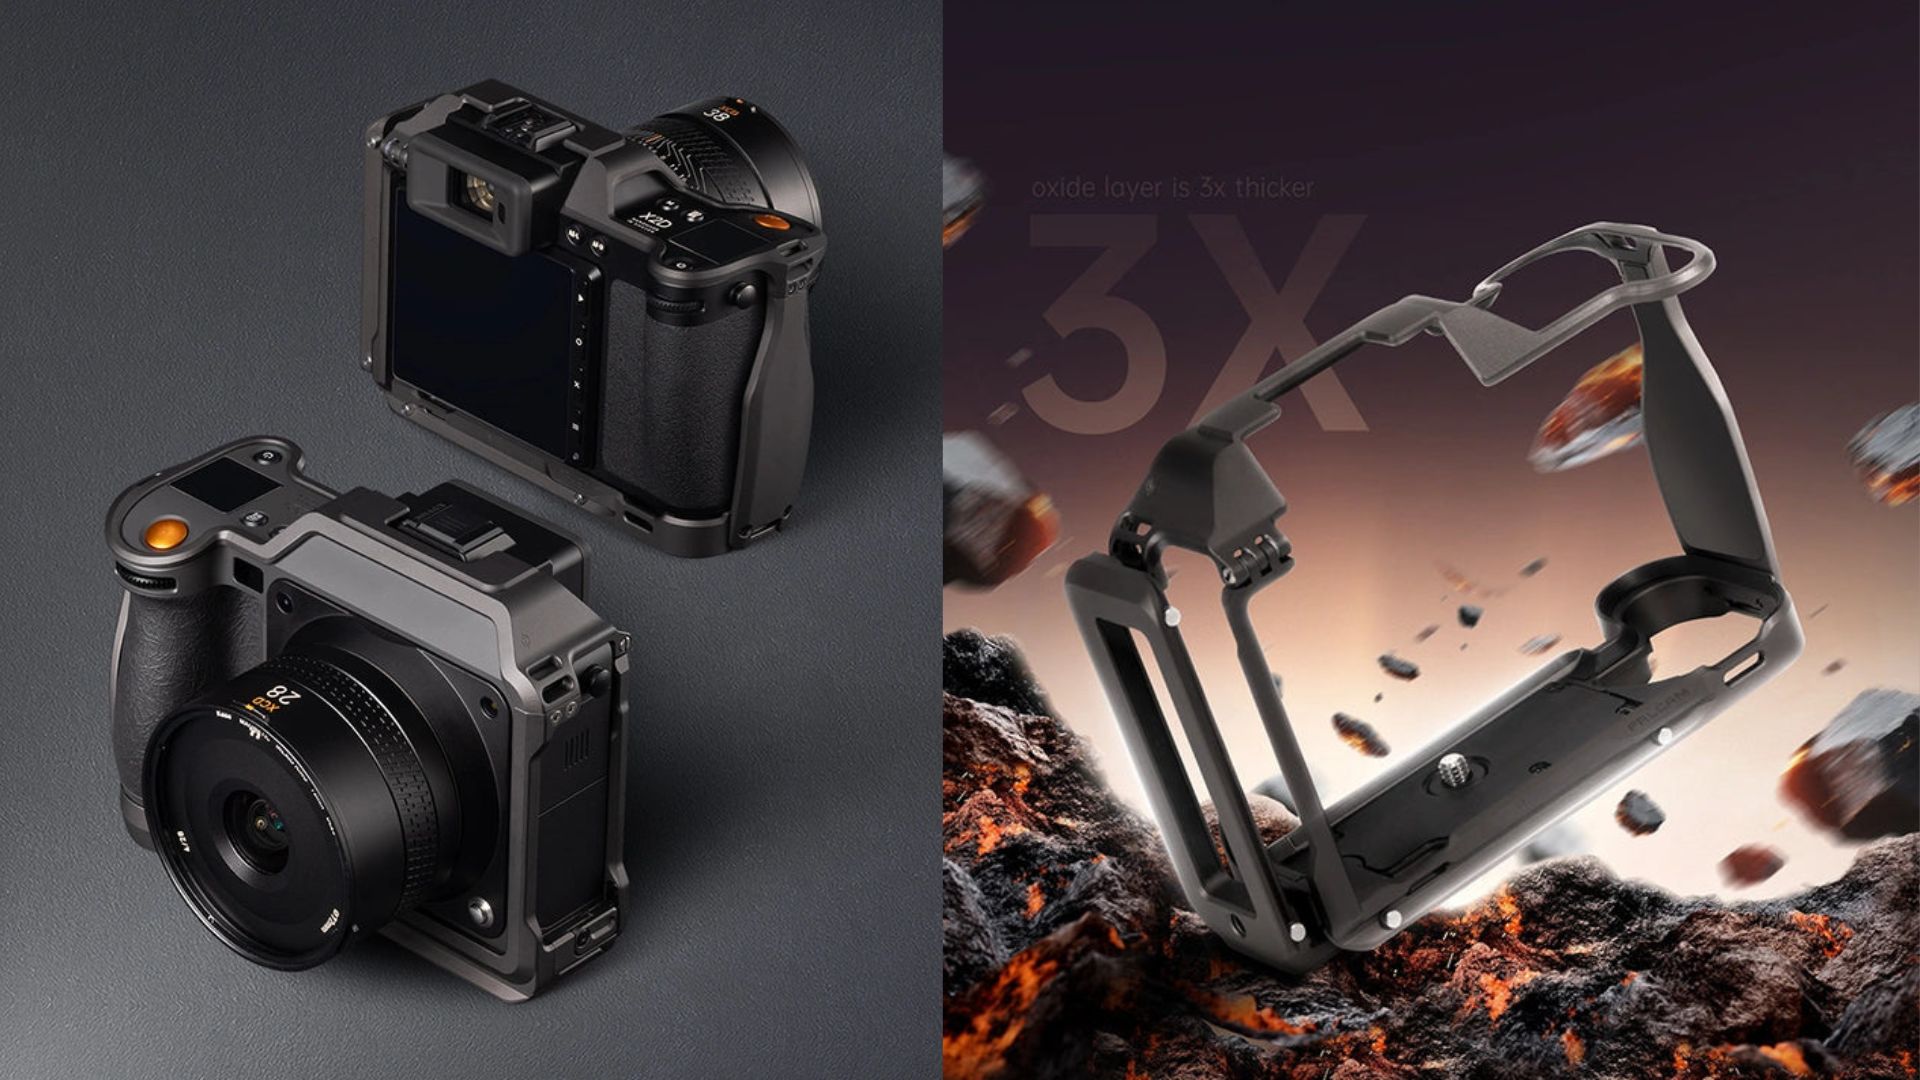
credits: Ulanzi
Ulanzi has announced a new FALCAM “Native Guardian” camera cage designed specifically for the Hasselblad X2D and X2D II. The cage is built from 6061 aluminium with a hard-anodised finish, and Ulanzi says the oxide layer is about three times thicker than what is typically used on camera cages, which should give it noticeably better scratch resistance. The frame includes screen-protection strips to keep the rear display from touching surfaces when the camera is placed face down, and the low-profile shape is stable even when using lenses like the XCD 28, 38, or 55mm.
One of the cage’s standout additions is a hidden AirTag-compatible compartment secured with a Y-shaped anti-theft screw that requires a special tool. With an AirTag installed, you can take advantage of features like departure alerts, laud alarms, and precise location tracking. Despite the added protection, the cage keeps all buttons, ports, and the battery fully accessible. A sliding cover plate gives quick access to the shutter-release cable and memory card slot, and the L-plate is adjustable without tools thanks to a large knurled screw.
The included modular L-plate offers flexibility depending on the shooting setup. The full configuration includes an integrated Arca-type quick-release plate for horizontal and vertical shooting. The cage also incorporates a multi-point mounting system with five 13 mm strap loops, plus CMOS alignment and plane marks for precise composition or use with shift and adapter lenses. Ulanzi lists the overall dimensions at 151.3 × 69.1 × 116 mm, with a weight of 174 g (without the L-plate) or 201 g (with the L-plate). Pricing is at $359.
You can see full details on Ulanzi’s website here
The Latest Leica, Canon And Nikon Rumours

credits: Leica
With 2025 winding down, the photography rumour mill is starting to settle into a clearer picture of what is still coming this year. One of the most likely announcements is the Leica Q3 Monochrom, expected to debut on November 20, 2025, according to multiple reports. As the name suggests, it will be a monochrome-only sibling to the existing Q3, using a true black-and-white sensor but sticking with the Q3’s familiar 28mm lens rather than the 43mm glass found on the Q3 43.
Canon, on the other hand, already had a big release this month with the EOS R6 Mark III and the RF 45mm f/1.2 STM. Even so, there were a bunch of rumours last September hinting at a second Canon event in late November focused entirely on lenses. The list of possibilities is pretty long, an RF 300–600mm f/4–5.6L USM, an RF 20–50mm f/4 PZ, and a refreshed RF 24–70mm f/2.8L that may show up with IS and a new autofocus system. It is hard to say which of these might actually appear, but none of them would be surprising given Canon’s current pace.
Nikon fans were hoping for at least a teaser of the Z9 II before the end of the year, but that now seems off the table. New reports suggest the camera won’t show up until sometime in 2026, which makes any major Nikon announcements in 2025 pretty unlikely. If Nikon does make a move, it will probably be lenses rather than bodies. The ones getting the most chatter right now include a 70–200mm f/2.8 II, an 85mm f/1.4, a new ultra-wide option, updated standard zooms like a 24–105mm or 24–50mm, a fast 100–300mm or 120–300mm f/2.8, and even some possible Z-mount cinema lenses in the works.
Download The World’s Best Lightroom Presets
Something You Have To Check Out
Growing on Social Media, especially as a Photographer/Creative is hard. This is where Hubspot’s Social Media Playbook comes in. It includes thousands of strategies used by social media marketing experts that can help you boost your own social media presence.
Make sure to check it out ⬇️

Is your social strategy ready for what's next in 2025?
HubSpot Media's latest Social Playbook reveals what's actually working for over 1,000 global marketing leaders across TikTok, Instagram, LinkedIn, Pinterest, Facebook, and YouTube.
Inside this comprehensive report, you’ll discover:
Which platforms are delivering the highest ROI in 2025
Content formats driving the most engagement across industries
How AI is transforming social content creation and analytics
Tactical recommendations you can implement immediately
Unlock the playbook—free when you subscribe to the Masters in Marketing newsletter.
Get cutting-edge insights, twice a week, from the marketing leaders shaping the future.
Weekly Photo Technique Exploration
Welcome to a new section of the magazine where every week we will explore a new photography technique from across various photography genres.
This week’s technique: Duotone Photography

credits: Adobe
What is duotone photography?
Duotone is just what it sounds like, a photo that uses two tones/colours, typically one for the highlights and one for the shadows. It strips away the full-colour spectrum and replaces it with a simplified, stylised colour combo. In general you can use duotone photography with any scene and subject, however the most popular use cases are portraits, posters, album covers etc.
How to create a duotone image
Technically, you can just shoot a regular image and apply the duotone effect afterwards in editing. It doesn’t require a specific lens, camera settings, or lighting setup, you just need a good photo with strong contrast and structure (that is pretty important).
Step 1: Start with a strong black & white base
Pick a photo with interesting contrast, shapes, textures. Portraits as mentioned work great (architectural shots and silhouettes work nicely as well). Convert it to black and white before doing anything else.
Step 2: Pick your two colours
You usually want one darker tone for shadows and one brighter tone for highlights. Again you can technically choose any two colours, but here are some classic combos, that are proven to work:
Navy & cyan
Purple & orange
Teal & red
Black & neon green
→ You can do subtle or high-contrast depending on the vibe/look you want.
Step 3: Apply the duotone effect
In Photoshop, go to Image > Mode > Grayscale, then Duotone. From there, you can assign custom colours to the shadow and highlight values. Or just use gradient maps for more flexibility.
In Lightroom or most mobile editors, you can use the split toning or colour grading tools, assign hues to shadows and highlights to mimic the effect.
Tips for better results
Start with photos that are simple and clean (almost minimal) → if you have a scene that is cluttered it can get messy pretty fast when you try to remove detail and focus on colour contrast.
Use it to enhance emotion. Blue and teal can feel cold or melancholic. Orange and pink can feel warm and dreamy. The key is to pick colours that match the feeling you want to evoke.
Don’t overdo the saturation. Keep the tones bold, but not blown-out, unless you are going for that hyper-stylised look of course.
The Rest of this Issue is for Premium Subscribers
