📸 The Magazine For Photographers - Bite Size
Read the Latest Photography News and Updates in the Creative Industry in 3-4 minutes or less ;)
In partnership with

Important note: All photography articles are NOT sponsored
The Latest News:
7Artisans’ New MF 50mm f/1.2 Prime Lens
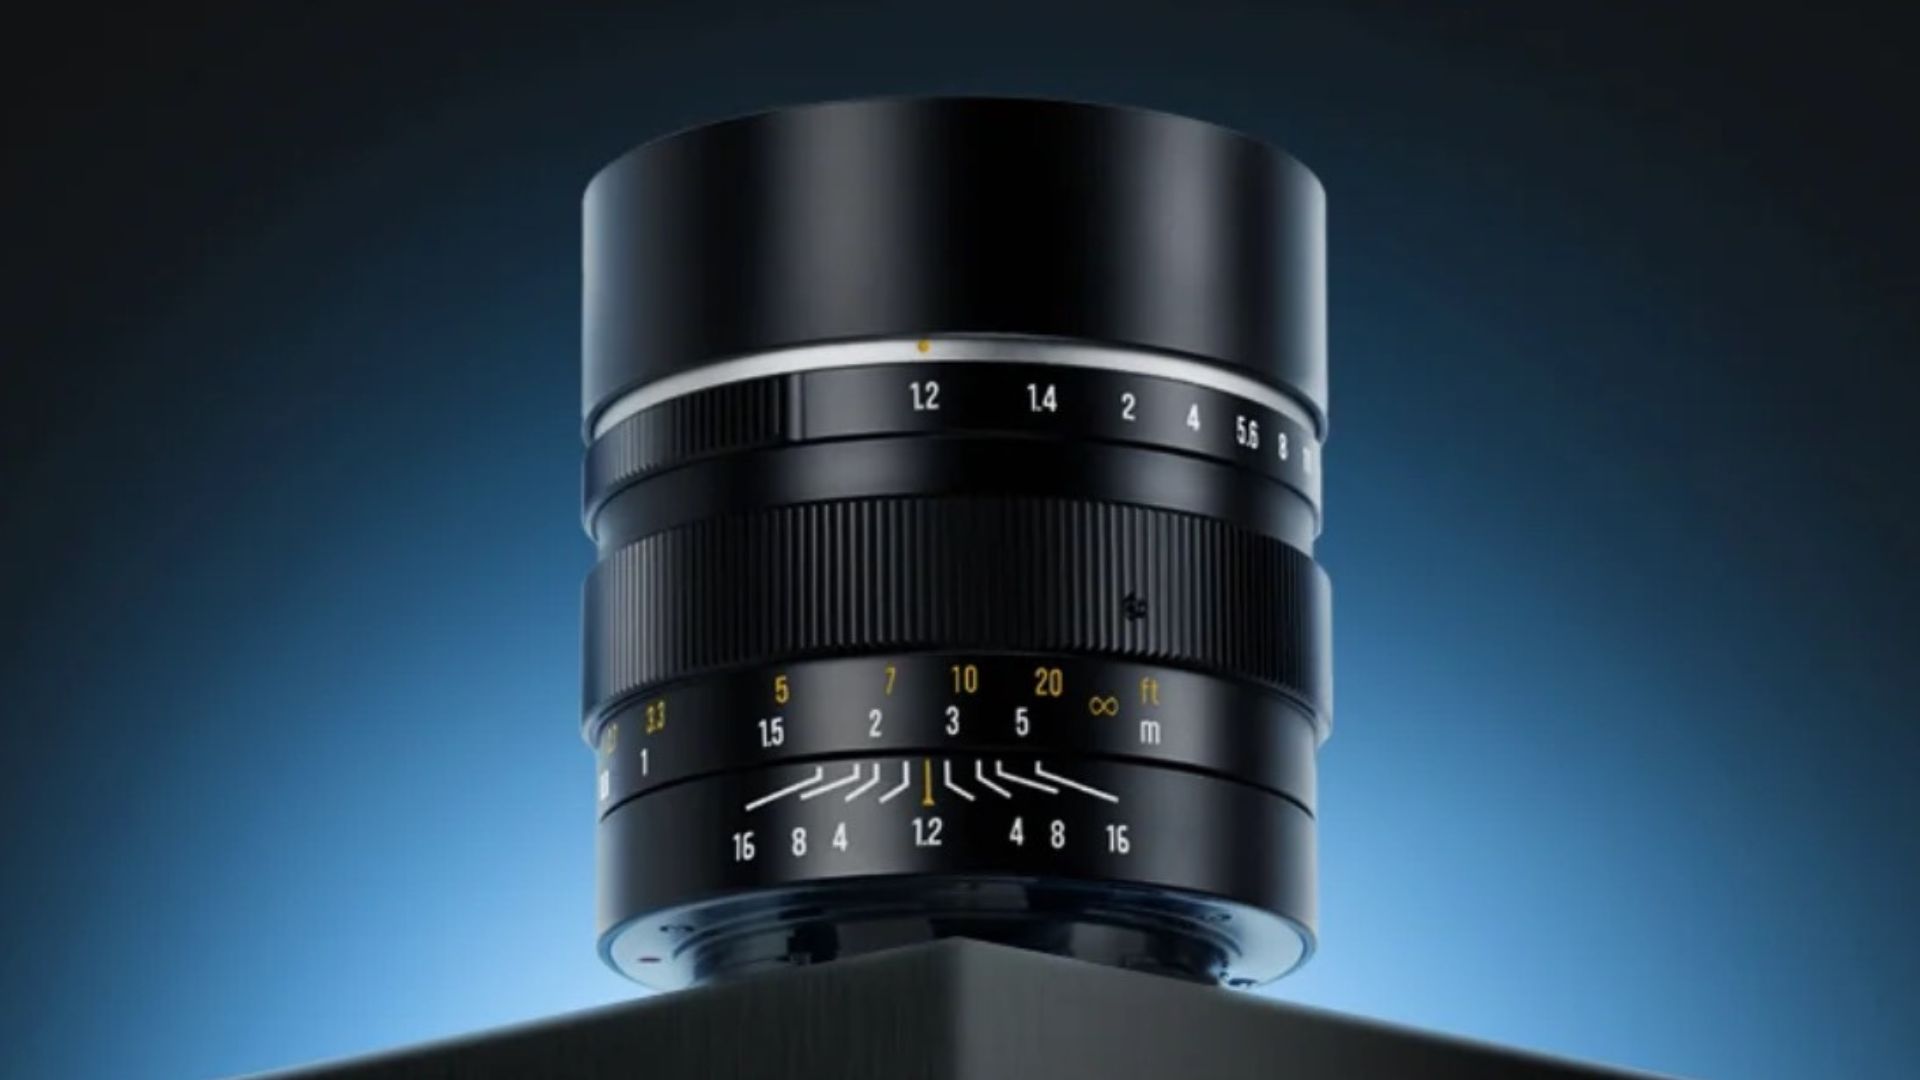
credits: 7Artisans
7Artisans has officially announced its new MF 50mm f/1.2 APS-C prime for Sony E, Fujifilm X, Nikon Z, and Micro Four Thirds mounts. Designed purely as a mechanical lens, it targets photographers who value fast apertures and hands-on control over autofocus or electronic communication. On APS-C sensors, the 50mm focal length translates to a short-telephoto field of view, while on Micro Four Thirds it behaves more like a classic portrait lens.
From an optical standpoint, the lens uses a relatively simple 7-element, 5-group construction that includes ED and aspherical elements to help manage chromatic aberration and distortion, especially wide open at f/1.2. The aperture ranges from f/1.2 to f/16 and uses an 11-blade diaphragm, which should help preserve smoother highlight rendering as the lens is stopped down. Focusing, as mentioned, is fully manual, with a minimum focus distance of 0.7 meters. The aperture ring is clicked, so changes happen in clear, defined steps instead of smoothly and steplessly.
Physically, the lens is built entirely from metal, weighs approximately 410 grams in the E-mount version and accepts 55mm front filters. A built-in sliding lens hood is integrated into the barrel, reducing flare without adding bulk or requiring accessories. The lens markings are coated with glow-in-the-dark paint, improving visibility in low-light environments, which is commonly done with manual only lenses. 7Artisans new 50mm f/1.2 APS-C prime is priced at $99 USD across all mounts.
You can see full details and sample shots on 7Artisans’ website here
Adobe Teamed Up With Open AI

credits: Adobe/Open AI
Adobe teamed up with Open AI to integrate Photoshop, Adobe Express, and Acrobat directly into ChatGPT, allowing users to handle a range of creative and document-related tasks without leaving the chat interface. The idea, according to Adobe, is to let people move quicker on everyday work by using text commands instead of jumping between apps. Users can now ask ChatGPT to perform actions like editing images, creating simple designs, or working with PDFs, with Adobe’s tools running in the background.
Photoshop is the most prominent part of the integration. Within ChatGPT, you can make common image edits such as adjusting brightness and colour, blurring or replacing backgrounds, applying effects, or editing specific areas of an image. Controls are kept relatively simple, relying on text prompts and sliders rather than the full Photoshop interface, so it is clearly meant for quick edits and lightweight workflows, not deep retouching or complex compositing. When more advanced work is needed, you can just open up the same file in the full Photoshop app and continue there without starting over.
Adobe Express and Acrobat are included as well, but they play a more supporting role. Express covers basic, template-based design tasks, while Acrobat handles everyday PDF work like editing text, merging files, or converting formats. The bigger story here is competition. Adobe is under increasing pressure from alternatives like Affinity, which was recently acquired by Canva and is now completely free, making professional-grade tools far more accessible. By bringing Photoshop into ChatGPT and offering these entry-level features at no cost, Adobe seems to be widening its funnel and trying to stay relevant at a time when Creative Cloud subscriptions are facing more scrutiny than ever.
Download The World’s Best Lightroom Presets
Something Worth Checking Out
Banish bad ads for good

Your site, your ad choices.
Don’t let intrusive ads ruin the experience for the audience you've worked hard to build.
With Google AdSense, you can ensure only the ads you want appear on your site, making it the strongest and most compelling option.
Don’t just take our word for it. DIY Eule, one of Germany’s largest sewing content creators says, “With Google AdSense, I can customize the placement, amount, and layout of ads on my site.”
Google AdSense gives you full control to customize exactly where you want ads—and where you don't. Use the powerful controls to designate ad-free zones, ensuring a positive user experience.
Weekly Photo Technique Exploration
Welcome to a new section of the magazine where every week we will explore a new photography technique from across various photography genres.
This week’s technique: Black Card Photography Technique

Charles Leung
What is the Black Card Photography Technique?
Black card photography is a technique that feels almost too simple once you understand it. The idea behind it is straightforward, instead of using an expensive graduated ND filter to balance the exposure between sky and foreground, you use a matte black card to manually control how much light hits different parts of the frame during the exposure.
If you think about it, it is basically dodging and burning, but done in-camera while the shutter is open.
If you have ever worked in/been in a darkroom and used dodge and burn tools, this will feel very familiar. The big difference is that instead of fixing exposure after the photo is taken, as mentioned, you are doing it in real time.
Why This Technique Exists
Even with modern sensors, cameras still struggle with scenes that have a big dynamic range, especially landscapes.
So for example some typical situation would be:
→ The foreground needs a long exposure to look right
→ The sky blows out way before the foreground is properly exposed
Of course you could use HDR, shoot brackets or blend exposures later, however that means more time in front of a screen and less time actually shooting.
The black card technique tries to tackle that and lets you,
→ Capture a more balanced exposure in a single frame
→ Reduce the need for heavy editing later
→ Avoid carrying (and especially buying) multiple graduated filters
What You Need
You really don’t need much:
A camera with manual controls
A sturdy tripod (We are doing long exposures after all)
A neutral density filter (commonly 6–10 stops)
A matte black card large enough to fully cover the front of your lens
That is it.
How the Technique Works
The black card is used to block light from the brightest part of the scene, usually the sky, for part of the exposure. So, you are not blocking the entire frame, only the area that would otherwise overexpose.
The key idea is that the foreground needs a long exposure while the sky needs a much shorter one
→ So you expose for the foreground first, while temporarily shielding the sky. Then you remove the card and let the sky expose for the remaining time.
A Simple Example
Let’s say:
You are using a 10-stop ND filter
Your foreground needs 30 seconds
Your sky only needs 5 seconds
Here is what you want to do:
Set your shutter speed to 30 seconds
Start the exposure
Immediately use the black card to cover the sky
Gently move the card over the sky area for 25 seconds
After 25 seconds, remove the card completely
Let the sky expose for the final 5 seconds
The result:
→ Properly exposed foreground
→ Properly exposed sky
→ No blown highlights
→ Minimal editing later
How to Measure Your Exposure
Here is an easy way on how to figure out your timings on location (it might seem a little complex at first but once you get it, it’s easy, super logical and intuitive):
Switch to Aperture Priority
Turn on Live View
Use spot metering
Meter the brightest part of the scene (so the sky)
Note the shutter speed
Meter the darkest part of the scene (the foreground)
Note that shutter speed too
→ The difference between those two times tells you
How long the sky should be blocked with the black card
And how long it should be exposed normally
Trust me, once you have done this a few times, it becomes second nature.
Where This Technique Works Best
The black card technique works best when, the horizon is relatively flat or clean, the sky is significantly brighter than the land and if you want a natural-looking transition.
It is absolutely perfect for:
Seascapes
Lakes
Flat coastlines
And open landscapes
The Rest of this Issue is for Premium Subscribers
